Month: July 2025

  • Blackberrying

    Each season holds a special place in my heart, and in my paintings. As the year turns then my subjects change too and new delights await every month.

    This month the hedgerows are filling with ripe blackberries and I love to spend a happy few hours capturing them in watercolour. I like to paint them loosely, I like to imagine the juice on the paper just like the juice on your fingers as you go blackberrying.

    So here is a short blog on blackberries

    I had already painted a few,. But before I added any paint to the paper , I used a paper clip and some masking fluid to quickly paint in some spiderwebs


    Then choosing my spot on the paper I begin a new blackberry, under-painting each little berry in cerulean blue


    Then adding a darker shade using rose madder and purple. 


    Now the scary bit……

    Grab a spray bottle


    Squirt the freshly painted blackberry with a spray, try to spray just half of the fruit and let the juices flow…..
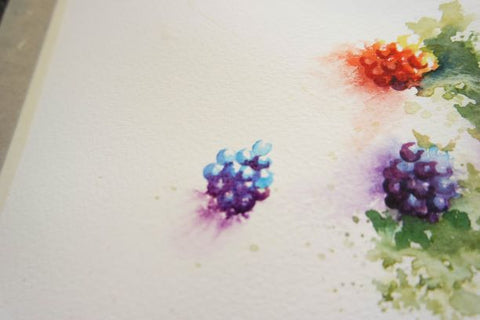


    Now you can leave the water to work it’s magic


    meanwhile I can work on more leaves . I use the brush horizontally and create shapes adding splots and splashes. I also drop darker shades into the green


    I also add some darker shades into the blackberry adding indigo to my purple colours.

    You can add as many berries as you like. The red berries are done in the same way but under painted in yellow, then red.

    It is so much fun and a special treat for September  


  • It’s all about the eyes….

    A shorter blog this week, I thought you might like to see ( again) how I go about painting eyes, and in particular the eye of an eagle owl. Just one eye, but there is so much to see, and the eyes give the creature it’s life , it’s personality even !

    I love to paint them, and you might like to have a go too.

    Firstly I draw the owl, paying attention to the eye.


    Then I paint the lightest colours first. When I first began watercolours I might have used masking fluid, but these days I don’t ( then I don’t have any hard edges). So I paint a light bright yellow, leaving the patches I want to be left white.


    so that is above the pencil line and to the right of the pupil. I also leave out the pupil white. I have added some darker oranges too. Keep looking at the photo you are using and carefully drop in darker colours where you think they should go.


    So slowly slowly build up the layers


    Then when you are happy you can start with the pupil


    I started with cerulean blue , remember that pencil line, it is lighter above. Then a darker indigo around the edges, this is wet in wet so it all blends.


     Now it gets darker , making a black with indigo and sepia. I add a hint of an pupil, but let some of the cerulean shine through. Leave the top section lighter.

    I have also added to the colours around the eye, darkening under the lid.


    Now to add the socket so the eye sits in place, using cerulean blue first. Then things get darker.


    look where the lighter sections are and leave some shining through.Also add the dark sections.

    I use my smaller brushes and treat the eye like a very small painting in itself. Once you can master eyes then you can use similar principles for other eyes. 

    I purposely haven’t shown you the rest of the owl, you can do theta however you wish, it is always good to try your own style, 

    Have a go and remember if it doesn’t go well put it to one side and have aother go when your ready …practise is never wasted.

    Have fun x

  • Painting a woodpecker, step by step .

    Hi the sun is shining and it’s getting warmer here in Devon, luckily my new studio is North facing so it stays relatively cool. I do hope wherever you are reading this that you’re doing ok.

    Today I thought I would show you step by step how to paint a woodpecker, one of my favourite birds. This is a greater spotted woodpecker native to the UK and relatively simple with just 3 main colours.

    I begin by sketching it out , then I use some masking fluid with my colour shaper tool to mask out the smaller white patches on the wings

    Then I begin on the eye

    I start with yellow ochre being careful to leave a white dot to show the light

    Then I add darker tones

    Then I spray around the bird to add some splatters and splashes,


     and I make a big mistake I destroy all the work I’ve just done on the eye


    So I spray off the eye and do it again


    I also add the the beak with cerulean blues and darker tones like indigo , I’m using small brushes to get as much detail as I can


    Now to add the colours, I am painting on damp paper, not completely dry, so the edges look feather- like

    There is blue in the black to add the light, 


    Juicy reds and Paynes Grey for the black


    He’s coming together

    Then moving onto the main part of his body 

    I start by adding the shadows on the ‘white’ wings

    I go  in with my trusty cerulean blue and add Paynes Grey for the black feathers, and add a bit of salt for texture.


    Keep going , be bold, and add the colours that you see in the bird

    Finally a bit of bling, I paint ‘size’ on the paper , a type of glue for gold leaf and leave to dry till it’s tacky. The tree is going to be a golden one

    I have also added some distant branches using my ‘go to’ shadow colour . cobalt blue and cadmium red,


    When everything is dry brush off the gold, and then rub off the masking fluid

    Finally add any little tweaks to your painting , stand back and see what you think


    ( the gold leaf is completely optional )

  • Enchanting fantasy and pagan cards from a new artist 🙂

    We have a new artist! Introducing Tina M Walker, an artist with a quirky, enchanting style capable of putting a smile on anyone’s face! We hope you love them as much as we do 🙂 

    Order now

    A pentacle symbol overlaid with green leaves, foliage and white flowers which extend outwards towards the edge of the design. A silvery full moon shines behind and within the circle of the pentacle. The background is deep blue.

    A grey stone Celtic cross, inlaid with Celtic knots, stands in long grass surrounded by red and orange spotted toadstools. Leaves and small white flowers twine upwards and through the cross, and more toadstools appear near the top. There's a mottled blue sky in the background.

    A cream toadstool house with red and white spotted roof, white curved windows, and an oval green door at the bottom. A low stone wall, entwined with leaves and red flowers, extends to each side, behind which is a mass of tall plants, several tall red toadstools on thin stems. An orange sun rises behind hte house against a pale cloudy sky, and a flock of birds flies by.
    Two toadstools with long pale stems are twined together. The cap of one of them is red with white spots, the other purple with white spots. More small toadstools are dotted around the foot of the pair, and leafy green tendrils twine around and up the main pair. The background is a mottled beige colour.

    Four pink and blue / green toadstool houses stand in a row. The roofs and walls of all four are liberally decorated with simple flower designs have curved windows (two stories, plus a window in the roof) and have curved blue front doors. Tiny toadstool-shaped chimney pots protrude from each roof, and red planters surrounded by stones and with leafy plants growing from each sit between each house. The background is a mottled pale blue.

    A cluster of toadstools with black caps. The cap of the centre toadstool has white spots. They're surrounded by the silhouettes of leafy plants, and a mist lies low on the ground. Above them a silvery full moon shines, and a flock of birds flies across. The background is a mottled beige.